Sunday, May 31, 2009

Strawberry Shortcakes


I found this great food website: smittenkitchen.com, with this gorgeous strawberry shortcake recipe. So I made it. She is right, the shortcakes are the best I've ever had. I was brought up on those spongy yellow discs (which I loved as a kid), and I'm not a big fan of the traditional biscuit shortcake I've had in the south. But now, now I have a shortcake recipe I can really enjoy.

Dessert, anyone?

Strawberry Shortcakes

Adapted from Claudia Fleming and Russ Parsons

Serves 6

1 2/3 cups (224 grams) all-purpose flour
3 1/2 tablespoons (50 grams) sugar
1 tablespoon plus 1/2 teaspoon (20 grams) baking powder
2 hard-boiled egg yolks
1/8 teaspoon salt

6 tablespoons (84 grams) cold unsalted butter, cut into 1/2-inch cubes
2 teaspoons lemon or orange zest (optional)
2/3 cup (168 grams) plus 1 tablespoon heavy cream

Shortcake assembly
1/2 pound strawberries, washed, hulled and quartered
2 tablespoons (25 grams) sugar
1 tablespoon lemon juice
1 cup whipping cream, beaten to soft peaks

In the bowl of a food processor, combine the flour, sugar, bak

ing powder, egg yolks, and salt. Pulse to combine. Add the butter and zest, if using, and pulse until the flour resembles coarse meal. Add 2/3 cup of cream and pulse until the dough comes together.

Turn the dough out onto a lightly floured work surface and gather into a shaggy mass. Knead a couple times to make it into a cohesive mass and then pat it into a rough circle about 6 to 7 inches in diameter, and 3/4 to 1-inch thick.

Using a sharp knife, cut the circle into 6 wedges and arrange on a parchment-lined baking sheet. Alternately, you can use a cookie cutter to make shapes of your choice. Chill for 20 minutes (and up to 2 hours).

Preheat oven to 350°F. Brush the tops of the shortcakes very lightly with heavy cream and sprinkle lightly with the coarse sugar. Bake until risen and golden brown, 18 to 20 minutes. Turn the pan around halfway through to ensure even cooking.

While the shortcakes are baking, toss the strawberries, sugar and lemon juice together in a bowl. Let stand several minutes. (If the strawberries are extremely firm, do this 30 minutes in advance.)

Split the shortcakes in half horizontally and set the tops aside. Place the bottoms on dessert plates and heap strawberries over them. Spoon whipped cream generously over the strawberries and replace the shortcake tops. Serve immediately with any remaining whipped cream on the side.

Thursday, May 28, 2009

And now....The Bees!

Today is a hot one. It registers 87 degrees in the shade, but the humidity makes it very heavy. I can tell when it is really hot because the dogs just flop down on the wood floors like rugs and you can't move them.

I also found out that today was hot for the bees. I went out to see them this afternoon (no rain today, yippee!) and found them happily making honey and hatching baby bees. Bees fan their wings when they are trying to cool down the hive (or heat it up in winter), and when I opened up the hive I saw several 'cooling bees' doing their thing. There weren't a lot of them, but enough so that I propped open the top of the hive a quarter inch just to keep the breeze moving. I have a screened bottom board (the very bottom level of the hive), so there is good ventilation, but I wanted to make sure the veranda was good sitting weather for them.

Here they are being the busy bees they naturally tend toward. Yes, that saying does ring true. "Busy as a bee" is busy.

The dark holes are where worker babies have hatched and are now going about their business, usually cleaning the cells and hive of trash. These two pictures are of the brood frames where the queen lays eggs and little bees grow and are born.


This is a photo looking down inside with two frames removed. They really like working on the four frames they came with, rather than my frames. Many experienced bee keepers tell me it is because they are plastic, which may be true, but I also don't want unknown beeswax to start my hive because you never know what is in it. So I'm trying plastic frames. Next year I'm going to try totally frame-less, so I'm really bucking the system then.


This frame is going to be filled with honey when completed.

Here they are working on one of the new plastic frames. The actual plastic is black, so you can see they are doing a good job of 'pulling out' the comb. They make it themselves from glands on the undersides of their thorax. I can see some bees walking around on the hive with what look like pale water wings on their legs. That is the bees wax they are getting ready to deposit into comb. Fascinating creatures.

Wednesday, May 27, 2009

Food on the table

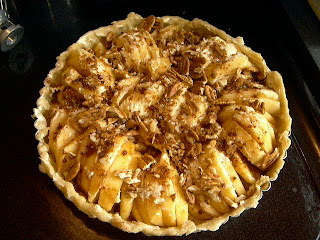
Just a quick foodie update for those interested. For Memorial Day I made a lovely apple tart to take to an outing. Here is what it looked like pre-oven:


And here is the finished tart. Mmm...yummy. I also made some whipped cream to top it off. It turned out very well, so I'm including the recipe below.


You can find great pictures of each step here:
http://smittenkitchen.com/2007/11/simplest-apple-tart/

Alice Waters’s Apple Tart

INGREDIENTS:
For dough:
1 cup unbleached all-purpose flour
1/2 teaspoon sugar
1/8 teaspoon salt
6 tablespoons (3/4 stick) unsalted butter, just softened, cut in 1/2-inch pieces
3 1/2 tablespoons chilled water

For filling:
2 pounds apples (Golden Delicious or another tart, firm variety), peeled, cored (save peels and cores), and sliced
2 tablespoons unsalted butter, melted
5 tablespoons sugar

For glaze: 1/2 cup sugar

MIX flour, sugar, and salt in a large bowl; add 2 tablespoons of the butter. Blend in a mixer until dough resembles coarse cornmeal. Add remaining butter; mix until biggest pieces look like large peas.

DRIBBLE in water, stir, then dribble in more, until dough just holds together. Toss with hands, letting it fall through fingers, until it’s ropy with some dry patches. If dry patches predominate, add another tablespoon water. Keep tossing until you can roll dough into a ball. Flatten into a 4-inch-thick disk; refrigerate. After at least 30 minutes, remove; let soften so it’s malleable but still cold. Smooth cracks at edges. On a lightly floured surface, roll into a 14-inch circle about 1/8 inch thick. Dust excess flour from both sides with a dry pastry brush.

PLACE dough in a lightly greased 9-inch round tart pan, or simply on a parchment-lined baking sheet if you wish to go free-form, or galette-style with it. Heat oven to 400°F. (If you have a pizza stone, place it in the center of the rack.)

OVERLAP apples on dough in a ring 2 inches from edge if going galette-style, or up to the sides if using the tart pan. Continue inward until you reach the center. Fold any dough hanging over pan back onto itself; crimp edges at 1-inch intervals.

BRUSH melted butter over apples and onto dough edge. Sprinkle 2 tablespoons sugar over dough edge and the other 3 tablespoons over apples. (Deb note: I found it nearly impossible to coat it with this much sugar, so I used a little less–more like 3 tablespoons. It made a lightly sweet tart, which we found perfect.)

BAKE in center of oven until apples are soft, with browned edges, and crust has caramelized to a dark golden brown (about 45 minutes), making sure to rotate tart every 15 minutes.

MAKE glaze: Put reserved peels and cores in a large saucepan, along with sugar. Pour in just enough water to cover; simmer for 25 minutes. Strain syrup through cheesecloth.

REMOVE tart from oven, and slide off parchment onto cooling rack. Let cool at least 15 minutes.

BRUSH glaze over tart, slice, and serve.


More food? Yes, of course!


This is a savory pie I made this week. It has meaty insides of heart and liver of pork, potatoes, onions, garlic, carrots, beets, tomatoes, cheese and a cheddar cheesy crust on top. It turned out "bloody good!" according to the Welshman. :0)


This is the impromptu salad I served with the pie. Lettuce from the garden, tomatoes, basil, mozzarella cheese, olives with balsamic vinegar and olive oil drizzle. I love summer foods!

Saturday, May 23, 2009

Farm Photo'palooza

I've been taking a lot of photos lately. So much going on here at the farm in Springtime. Here are some of my favorite.


This is Mary with her future Thanksgiving dinner.


One of two peach trees in the dog run. This one looks to be ripening up first.


Mmmm...peaches.


Barry's newest creation: The Turkey House. Looks a bit like Turkey-Alcatraz to me, but I'm sure with some wall to wall carpet, a wetbar and grill they will be quite happy out there.

It's Barry-sized! I told him if he makes me mad I'll lock him inside. No way he's getting out through the turkey entrance. Bwa ha ha ha ha!

The chicken run, with chickens.

Two of the Silver Lace Wyandotte chicks.

My garden in the Amazon rain forest. I can't keep up with the weeds. The Scarlet runner beans are doing well, though.
Tomatoes, basil, peppers and potatoes in the background.
My garlic. I am thrilled with how it is coming along. All organic from organic stock at Hood River Farms in Oregon.


A butterfly plant of some kind in the garden. We had so many butterflies last summer it was like we lived at Calloway Gardens.


A lily and spiderwort behind.


We mow the field. The first pic is Barry, the other is me driving the beast through the trees.


More Cochin eggs, eleven in all waiting to become baby chicks.


Water lilies? They are in the water pond and they are lilies...left by former owners. I love the little 'barrel pond'.


Our rooster, Big Boy. He has spurs three inches long, but he is as sweet as he can be to humans. Barry talks to him and the rooster seems to react to him. He's a good rooster.

That's Harriet the Pekin Duck sitting down, and one of our Khaki Cambell's in the background on the left.

Friday, May 22, 2009

Evening with Friends

The other evening we were pleased to entertain
our friends Susan and Mary at the Farm. I fired up the grill and made some spice and dark sugar-rubbed true country ribs, Vidalia onions and carrots. Mary brought potato salad and watermelon. We had a great time drinking Firefly Iced Tea with lemonade, playing with the turkeys and having a grand old time. I also tried out a new recipe for Sweet Potato Biscuits.

I'm not normally a biscuit kind of girl. I'm from Iowa, and biscuits are nice, but not a religion like they are here in the south. However, since I'm a recipe tester for a cooking magazine and this month's test recipe was Sweet Potato Biscuits-re do, I decided to make them for our discriminating Southern-born friends. They received four human thumbs-up reviews, and several paws-up reviews from the dog audience gathered in the kitchen. Later that evening Mary's dog, Dudley the Deadly Dachshund, pinched and ate every biscuit I sent home with them. That was okay as he needed to gain a few ounces, anyway, but here's the recipe so Mary can make some more, and you can too. And yes, I do cook with lard. If you haven't heard, that solid vegetable shortening can kill you. Non-hydrogenated lard is wonderful stuff. 'Nuf said.
********************************


Sweet Potato Biscuits
Makes 16 biscuits

2 1/2 pounds sweet potatoes (4-5 medium)
2 T cider vinegar
3 1/4 cups cake flour
1/4 cup packed dark brown sugar
5 t baking powder
1/2 t baking soda
1 1/2 t salt
8 T (1 stick) unsalted butter, cut into 1/2 inch pieces, chilled
2 T unsalted butter, melted
4 T lard, cut into small pieces

1. MICROWAVE POTATOES: prick potatoes all over with fork. Microwave until skin is wet and potatoes are very soft, 15-20 min., flipping enough to handle, scoop flesh into bowl and mash until smooth. (You should have two cups. If you have excess, reserve for another purpose.) Stir in vinegar. Refrigerate until cool, about 15 minutes.

2. MAKE DOUGH: Adjust oven rack to middle position and heat oven to 425 degrees. Line rimmed baking sheet with parchment paper. Pulse flour, sugar, baking powder, baking soda, salt, chilled butter, and lard in a food processor until mixture resembles coarse meal. Transfer to bowl with cool potatoes and fold with rubber spatula until incorporated.

3. FORM BISCUITS: Turn dough out onto floured surface and knead until smooth, 8-10 times. Pat dough into 9-inch circle, about 1-inch thick. Using a 2 1/2 inch biscuit cutter (or glass) dipped in flour, cut out biscuits and arrange on prepared baking sheet. Pat remaining dough into 1-inch-thick circle and cut out more biscuits.

4. BAKE: Brush prepared biscuits with melted butter. Bake until golden brown, 18-22 minutes. Let cool 15 minutes. Serve slathered with butter or jam or sandwiched with ham and mustard.

Out and about


A few days ago the chicks and poults (baby chickens and turkeys) made a brave move to the out of doors. We have been keeping them in cardboard boxes in our dining room, which has gotten very dusty thanks to the dust baths the chickens like to have daily. Barry had finished the chicken 'tractor' and pen for them, so out the went and never looked back.

Here they are trying to decide if this new world is a good one or a bad one. They stood on the entry ramp for most of the day. One little chick came out right away and stayed out. Now it's a job to get them to go in at night. We recently added our cochin chicks into this group and they are getting along fine. Yesterday we were almost wiped out by two hawks who have come to live in our field. They got three of our little cochin chicks before we could stop them. Barry wants to get a gun, I wanted to cover the pen and keep the little chickens in for a few weeks. We covered the pen and are letting the dogs run the field for a few days.

It is very sad to lose an animal that you've watched hatch from the egg and grow up in your barn. We've got another cochin mama hen sitting on eleven eggs. That wasn't the plan as we are tired of the broody things. They just sit on eggs and don't lay them. We try to keep them moving, but this girl had hidden all these eggs in a corner in the feed room and has been sitting on them. I only found them because the roosters were harassing her, and when I punted the lot of them across the field she went running into the barn. I followed her and there she was with her little clutch of eggs. So if anyone is interested in keeping bantam chickens, we'll have a few for sale in the summer. They are lovely little birds, very friendly and compact for urban gardens. If you'd like a testimonial or two I can refer you to our friend, Chicken Coop Mary, who has three of ours from last spring and she's been having a grand old time in East Atlanta with them.


Here is the inside of the new chicken tractor. Very spacious compared to their former box. While this seems small for 27 grown chickens, they will only nest at night and they love being close when they sleep. They will have the run of the field during the day (after they are bigger).


Turkey Day Out


I felt bad for the turkeys now that the chicks had their indoor/outdoor condo, so I got an old rabbit pen the former owners had left behind and I trotted the turkeys out to the yard.

Barry is building a fabulous new turkey apartment for them (bigger than the chickens', they might get jealous), but it isn't finished yet. Once it is I'll have the dish-tv set up and make sure their hot tub is working okay before they inhabit it. Until then they are living on the front screened porch in a pen. They keep growing bigger, so I think we need to move them again soon.
At first they were a little wary of this new place, "outside", but after about 30 minutes they were chirping and singing like crazy. Yes, turkeys sing. I don't know what else to call it, but it sounds like high-pitched whistling but the seem to be talking to each other, and us.

The turkeys are still winning in the "I've got character" contest against the chickens. Don't get me wrong, I really like chickens, that's why I kept them in the city and now have over 50 around the place. But the turkeys are so...well...dog-like is the best way to describe it. They come to the side of the pen when we go out to see them, they chirp and tweet when we talk to them, and a couple of them even 'ask' to be picked up. I'm not joking. Barry has is special turkey (Houdini 1) who always wants to be picked up and carried. I keep reminding Barry that they will be Thanksgiving dinners for people, but I wonder how we are going to say goodbye to all the cheeky birds.

Tuesday, May 12, 2009

The bees settle in to Treffynnon Farm

Installing the bees into their new home was quite an interesting challenge. I have been reading all the bee books I could find, plus bee info on the Internet, and I even asked Cory at Beeyond Wonderful for some tips. But you know, no matter how much you prepare yourself, opening that box of buzzing, roiling insects who would kill you if you touched their children, well, that is just a little bit intimidating.

When I opened the nuc box, this is what I saw: bees, bees and more bees! Over 25,000 is what Cory told me. Now in the middle of the day most of them are supposed to be out and about foraging for nectar and pollen. I'm not sure about that. This box was so full of bees I think they had a bank holiday or something. You can see in this picture that they have been busy building comb, and it is a little bit wonky, not straight at all.

Here is a shot of all four frames in the box.

If you look closely you can see how the bees have started working on the side of the box (at the bottom of the photo) to build another frame. They are more than ready for more frames to build out with beeswax. They had even started a drop down comb on the inside lid of the box. I pried that off because it was just so cool. They wouldn't have been able to use it anyway.

Now that the box is open, I have to pry each frame out of the box and carefully transfer in to the super (wooden box on the ground, it is the foundation for a bee hive). Sounds simple, doesn't it? Now, add to that the buzzing bees around your head, hundreds of bees on the frame which weighs at least 5 pounds, and the curious bees want to crawl all over the frame as I am putting it into the super, even under the frame where it is supposed to rest on the little piece of wood on the side. All the books tell you to try and not squish any bees because when they die the emit an odor that sends the other bees into a frenzy of concern and they are more likely to try and sting the bee keeper. Oh, and did I mention I'm wearing thick leather gloves and a hat that doesn't fit and keeps sliding off my head. Geez, the problems that come up when you least need them!

I am smiling for the camera, but I am totally freaked out at this point. I have transferred two of the nuc frames to my super on the ground, and there are bees all around me buzzing and curious. I don't really get the sense that they are threatening, but my natural instinct is to run away screaming and swatting at them with my hands. I won't do that, but that's what is happening on one level of my brain.

The queen was on this frame. Just as I was putting it in the super Barry asked, "Have you found the queen?", and honestly, I hadn't even thought about her. My goal was to get those bees in the new box and get out of there. Plus, I had to do all of this very s l o w l y so as not to alarm the bees. Don't get me wrong, on one level I was freaking out, but on another level I was having a great time. I want to get to a point where I'm not so inexperienced so that I can enjoy it more, if that makes sense. Getting stung day one made me not worry as much about that, but there will always be that "Attack of the Killer Bees" movie scene in my head. Damn media generation stuff. But then I saw her--the queen was moving around the frame! Wow, I actually spotted her! I felt so...so...bee keeper-y.


Within just a few minutes I got all four frames transferred into the "super" and was ready to close up the hive. I am only using one super right now, but as fast as they are building comb it looks like I'll be adding another one in just a couple of weeks. Their four frames were full of comb, so I imagine they will fill up the other four fast.
I am not closing up the super. The white strip you see is a top feeder that has sugar syrup in it to give the bees food until they get to foraging on their own. Some bee keepers use corn syrup, but many of you know my hatred of the stuff in my own food (go rent "King Corn"), so I'm going with regular old white sugar. The interesting point in trying new things is that it opens you up to information and opinions you didn't even know were out there. Last night came across some fascinating information on all natural bee rearing. This bee keeping in Wyoming uses no medications of any kind, doesn't supplement feed, keeps his queen for several years, and uses some weird looking bee hives. I like what he has to say, so I'm going to give it a try. The bees I have were medicated before I got them, but if they do their stuff all summer then by next spring there will actually be a whole new colony of workers, so all natural at that point. If you are interested, check out his website: http://www.bushfarms.com/bees.htm


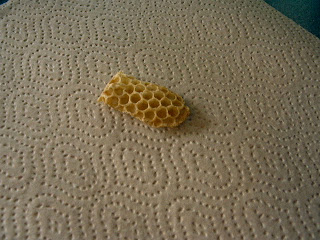
This is that small piece of comb the bees had started on the roof of the box. It is about two inches long by one inch wide. Pretty amazing that those little insects can create such a beautiful and useful thing. Barry's comment: "Who taught them how to do this? It is just amazing they can do this". Nature amazes me every single day.

Monday, May 11, 2009

The bees have landed.

Today was Bee Day on the calendar for the farm. We trundled down to McDonough, Georgia to pick up our Nuc (bee hive nucleus) hive from Mike at beeyondwonderful.com. A nuc is like a mini hive where all the bees know each other already and they have a mated queen who has been busy laying eggs. All we do is bring them home and install them into our ready hive and supposedly they start making honey. Much better than bees-by-mail, at least for this beginner. Plus we've already freaked out the Conyer's post office twice this month with deliveries of turkeys and chicks, I can't imagine what the bees would do to them.

Mike's son Cody (who has been working with bees since he was five!) was very friendly and helpful, especially when bees started coming out of the bee box. Tragedy did not ensue, as it was simply a case of a couple of hitch-hiker bees along for the ride. Sadly, I did crush one bee by accident when I set the box in the truck. I didn't mean to do it, I didn't even know the little girl was there. But we pay for our sins, and the road to hell is paved with good intentions, and so the karmic wheel spins toward me later in the evening. More on that later.

Here is the bee hive and other bee items being delivered to the side yard by B.G. Transport, LLC.

The hive and bee things arrived last week. I spent this week getting it all ready for a season in the jungle of our backyard. I am trying out the all natural method of bee keeping. I've treated the outsides of the hive with linseed oil rather than painting it. I have no idea if it will hold up to the weather here in the south, but we'll find out. Barry and I chose an idyllic spot for the first hive (well, idyllic for the bees, we hope).

The perfect spot for bees: dappled sunlight, windbreak, morning light, no dogs or chickens to disturb them, and we can see the hive from the breakfast room window.

This is the waxed cardboard box the bees come in. Yes, this was in the truck with us all the way home from McDonough. They were buzzing like crazy. Apparently when a bee dies near the hive the other bees can smell the change and it really, really upsets them. Ours didn't sound happy.

The whole things weighs about 25 lbs, which doesn't sound like much until you are trying to open the gate at the same time as you are trying not to drop the box, which means you really aren't paying attention to where your hand is which means somehow one of the little buggers must have been waiting on the other side of the air hole and...

OUCH! Yes, one stung me even before I got the box in the yard. That was the most concentrated pain for about 30 seconds that I have ever felt. Then it wasn't so bad and I almost forgot about it. Part of the reason I forgot so soon was probably because as I said "Ouch! Damn, one stung me!", Barry said (don't try this at home, spouses), "Well, it won't be the last sting you'll get, will it?".

I won't tell you my response as I am trying to keep this blog as family friendly as possible. I will advise all significant others to respond to the new beekeepers first sting with something more along the lines of: "Oh, honey, we knew it would happen, but I'm sorry you're in pain". Harrumpf.


I don't know if you can see the sting spot. It is in the pad of my hand just below my fingers between the middle and ring finger. It has swollen a little and my hand is slightly achy, but other than that, I have successfully survived my first sting as a beekeeper. Glad to get that out of the way, now on to other things.


Me in my bee gear. Note the funny hat and boots. Pre- sting I wasn't sure I needed gloves, but I'm keeping them on now.

I soldiered bravely onward, getting my bees ready to spend the night in their new area. I am leaving them in their box until tomorrow, because otherwise they might get confused. The queen will stay in the box, but the workers will go out and have a look around, use the toilet (yes, bees do their business outside the hive) and then return my scenting for the queen. Tomorrow around noon when the workers are all out mauling our honeysuckle I will use my smoker on them and move the full frames of the nuc into my new hive. Since the workers now know the location of their new home they will be able to return and have a new condo to boot.


Once I got the smoker going I puffed them with it a little, then opened the hole in the box. It was just plugged with a plastic plug. As soon as I popped it out they all came flying at me. (puff, puff....PUFF!!!!) Whew, bee keeping is a rough business.


Now I will make sugar syrup to feed them until they get their honey flow on, and I wait and watch and add supers (more condo floors) when needed. More on the moving in tomorrow.


((PS: Big thanks to Susan for the reminder about apis m. homeopathic remedy. I took it as soon as I could get inside and I'm sure it helped.))